Sunday, December 25, 2011

Jars for presents

As we were working on these my oldest lights up and says, "Mom! You must take pictures to post on Pintrest!"

Well, I'll post them here and share there. They were fun.


I mixed some white glue with water and we "painted" the mason jar with the mixture. We then laid tissue paper on the wet surface and "painted" over the paper to insure it was stuck.


The colors did bleed some but it made a neat effect.


I set the jars in the oven not to bake, but because it was a safe spot away from curious little hands.


We placed cousin's Christmas presents inside to ship - I think they made it safely.
I used a circle of construction paper under the ring to brighten up the lid and write the recipients name. Festive looking, huh?


I also had the kids repeat this on tin cans to make some pencil/tool holders for their daddy. I suggested they try doing fewer layers and they did which allowed some of the metallic shimmer come through. Now, I might have them do more for the school room.

Update on Chair pockets

We are loving the convenience of these chair pockets, but we discovered that turning the pillowcase on itself one more time gave us another two pockets (one on the side you sit, perfect if you only put a thin flat item in it) and made the pockets a more useful depth - the notebooks don't disappear inside.


(So, we started with the pillowcase right side out, turned 2/3 way inside out then back on itself so it is 1/3 the normal depth. Clear as mud?)

Monday, December 12, 2011

School notebook pockets

I just started having my big girls use spiral notebooks for their school work (their 3 ring notebooks are already too full and I'm not ready to thin them out). I needed someplace quick to store them as they just didn't stand nicely on the shelves and there wasn't enough room to lay them down. I had recently read a school teacher turned pillowcases into chair back pockets; I have extra pillow cases we don't use...so voila we have our solution!


First, I turned the case inside out.


Then turned it halfway right side out so the opening and the open end and the bottom seam met. At this point I just safety pinned the corners, but I will go back later and stitch the sides so they will hold better.


Finally, I opened one side to slip it over the chair back, so the notebooks sit on the bottom seam of the case.


The Girls picked out their own pillowcases and I can tell the side stitching will be necessary soon but the pins should be sufficient till the weekend. Quick, easy, and colorful. Who could ask for more?

Saturday, December 10, 2011

These were a HOOT to make

Armed with my new camera, I'm back with my newest project. Inspired by an owl bag on Pintrest, I decided to make some for some special young girls. I wanted to make them youthful but not babyish as the age of these girls range from 4 to almost 11.


It took some time cut all the pieces out.


It took a little longer to stitch the faces on. I've never done applique before so I had to play with the stitching some.


Made a simple pouch with a lining.


Then I added grommets and a cord. I have to admit, putting grommets into a project is kinda fun. I think I need more projects with grommets...


Done, and ready to wrap.

Thursday, October 13, 2011

Breakfast casserole

Sorry no pics since camera went AWOL.

I have been making casseroles for breakfast lately and they have been a big hit. The first one was throw together on a morning with not much time and probably could have been left in the oven just a little longer but it was done enough and enjoyed.

Biscuit and Egg cass.

1 batch of biscuits - Bisquick directions for 9 biscuits
Spread on the bottom of a greased pan.
1 dz eggs and 1/2 cup milk beaten
Stir in +/- 1 cup browned sausage (left over from breakfast burritos the night before)
Pour egg and sausage mixture over biscuit dough
sprinkle shredded cheese over top

Bake at 450 for 10 minutes or until egg is set.

I'd like to try this with bacon crumbles sometime.

Non-French Toast

We love 'over night french toast' but I rarely have time to prepare it ahead of time. I had half a loaf of homemade bread from last night, so I crumpled the slices with the food processor. Then I beat a doz eggs, some milk, about 1/2 cup sugar, some cinnamon and a dash of vanilla. I first spread the crumbs on the bottom of a pan, then pour egg mixture over the top. Bake at 450 for 20 min or till egg is set. This is very filling!

I wish I could share pictures, these were a great hit and my kiddos are now excited anytime I mention breakfast casserole!

Wednesday, September 28, 2011

Sandwich buns

After many attempts, I have finally found a bun recipe I can use - and my family loves! I found, thanks to Pintrest, a traditional recipe that has you activate the yeast, add ingredients slowly, kneed let rise...all those good bread making steps. I, with 4 kids homeschooling all day, don't have the energy to keep that up as often as we would eat buns. So I cheated and adapted the same recipe to be bread machine friendly. So, here is what I came up with:

Ingredients:
3 tbsp. warm milk
1 cup warm water
2 tsp. instant yeast
2½ tbsp. sugar
1½ tsp. salt
1 large egg
3 cups bread flour
1/3 cup all-purpose flour
2½ tbsp. unsalted butter, softened

In a small bowl mix the water, milk, and egg with a wisk. Pour mixture into bottom of pan. Add the rest of the dry ingredients as directed by your machine manual. Set on dough setting and start. Near the end of the dough setting, grease a baking sheet (one with raised edges is preferred). Once the dough is ready, divide it into 12 even balls (I use a scale to get get them as close to the same size as possible).


I roll each ball on the sheet to give it a thin coat of grease so they don't stick as they rise. Lay them evenly spaced on the sheet and cover with an oiled (sprayed with non-stick spray) piece of plastic wrap. If you wrap it tight the buns will flatten some as they rise and make more reasonable shaped buns instead of spheres to big to take a bite of.


Let rise for about an hour or until doubled. (I find my oven, turned off, with the light turned on is about the right temperature for this step)


When done rising, remove pan from oven and remove plastic wrap. Place a shallow pan of water in the bottom of the oven, and pre-heat oven to 400 F. While the oven is heating, whisk an egg and a little water and brush over the tops of the buns. You can add sesame seeds at this point if you wish but I never have those on hand so I opt out.

Bake for 15 minutes or until golden. Remove and cool on a wire rack.


These will also freeze and re-heat well. Maybe not quite as good as fresh, but close.

Wednesday, August 24, 2011

To add a little excitement to our long car rides on our upcoming vacation, I put together these travel notebooks for each of the kiddos. They picked out fabric from my scrap pile.


I also made pencil pouches with zippers to hold all the writing/coloring things and small toys (cars for the car-obsessed-boy)


I found some printable coloring pages to fill them.


I also put several pencil/paper games in for the older ones including some bingo, license plate game, tic-tac-toe sheets, and several games of the dot game.


They are all eager to get this show on the road so they can use these!


Friday, August 19, 2011

Saturday, August 13, 2011

Iced Coffee Treat


Since moving to a more tropical climate, I have found iced coffee to be a nice treat as hot coffee just doesn't sound appropriate. Running out isn't such a great option time wise, nor financially. So, after a few tries I finally figured out how to make it to my taste.

First start with a pot of coffee. I make it a little stronger since it will be mixed with ice. My pot is small, and since I will drink only 1-2 cups of coffee a day, and occasionally give my 2nd daughter coffee to help with focus it works well. I make a full to the rim pot and it will last me a day or two.


When the pot is done I take it out and let it cool, then I have a quart mason jar that I pour it into and keep it in the frig. I do this as I'm enjoying my last cup of Iced Joe so I have some chilling all the time.
Before I pull the chilled jar out, I take my favorite mug and fill it with ice, all the way.


Pull the cold coffee out of the frig.


I like my coffee creamy so I fill the iced fill mug half full, and add sweetener. Sometimes I might add a little vanilla if I'm in a fancy mood.


Finally, I add milk to fill. Regular milk. Creamers are nice, but I like what I get with plain milk (I use skim) so that is what I use.


I don't normally like ice in my drinks but I get around this by using a straw to stir, sip and enjoy! My mornings are much happier.


Chick Chick Chicken


Yeah, chicken week.

This week I thought I would tackle chicken. Since I'm using the crock pot I may to a second batch to night. I pulled out both of my slow cookers. The first one I inherited from my Grandma. I have no idea how old it is, but it still works great and it is nice to have something from Grandma in my kitchen.
I filled it with frozen chicken breast, added about a cup of water and sprinkled salt, pepper and just a bit of garlic. Turned in on low and moved on. (Oh, how I love the ease of slow cookers!)


Next for the whole chicken. Honestly I would be filling my second pot with more chicken breast if my kiddos hadn't requested a whole chicken yesterday. They think of a meal with a whole chicken as a science lesson-dissecting the bird and asking about what each bone is and it's purpose in the body. Daddy started this so who am I to end it. They love it, so I'm humoring them...gotta foster that love of learning

This pot isn't so special, but it is bigger and easier to clean...and it has a timed setting...newer.


Ok, take the chicken out and place foil balls in the bottom to hold the chicken out of the drippings.


Rinse chicken and pull out the bag of insides. I have bought chicken (same brand) that didn't have that package, so if they aren't in there don't flip (someone had to tell me that). I don't cook these, but there are those who do...


Place on top of the foil balls. I spread a little butter on and sprinkle salt, pepper, and a tad of paprika (I would use more but kiddlets had a phobia of spice so I keep it mellow - for now.


Set it to low for 8 hours and sit back. Ok, sit back doesn't last long in this house. I'm planning for school and over seeing chores getting done.


The chicken is done when it is falling apart cooked.


I had volunteers this time for shredding the breasts, and I did the whole chicken.


The chicken breasts were a little dryer and not as easy to shred, but the whole chicken, while juicier and easier to shred it yielded less than 2 lbs of meat.


The shredded meat was divided into freezer bags at about 1 lb per bag (less for the meat from the whole chicken).


Now I have 5 bags of shredded chicken in the freezer for future meals. I think our first one shall be chicken enchiladas.

Sunday, August 7, 2011

Beef Week

Since the grocery bill for feeding 6 has been rising quickly I have been back into "make the money stretch" mode. In the past I have done Once-a-month cooking which did help the budget, but many of the meals were not a huge hit with the kids, and it meant 2 miserable days of cooking. To help eliminate the picky groaning, I had the kids help plan and cook meals. For that purpose it worked beautifully, but it wasn't so kind on the budget and took more time. So I have been looking for a compromise that will be kind to the budget and the kids still get to help with some of the planning and prep.

Not long ago I ran across a blog (sorry i don't recall where) that mentioned she froze some browned hamburger meat. I thought, "Hey, if I had the meat ready and a list of meals to choose from that would save time." The blog also mentioned how she used carrots to make the meat stretch further...I need that. I also wasn't sure how much help I would be getting (sweet hubby-man was having to work) so I didn't want to do a whole months worth of meals, so I decided to break it down by meat and only do one meat a week and stock up over several weeks.

This week - BEEF WEEK.

The day started with grating carrots. Well, grating carrots, chasing kids in and out of showers, making sure chores were done, and general keeping the peace that goes along with having 4 kids 8 years old and under. By lunch time I was ready to move on. While the 3 youngest went to quiet time after lunch, my oldest offered to help with the grating while I got to work on the meat balls.


I had a recipe for the meat balls...then I fudged it a lot. I started with 4 eggs and about a cup of diced onions.


Then 2 sleeves of crushed crackers - I had my 4yo crush them earlier durring one of those "peace keeping" disruptions earlier.


Next came 2 cups of grated carrots, and seasoning (salt, italian seasoning, garlic...just about that much, looks good - I used to measure everything, but my husband has rubbed off on me)


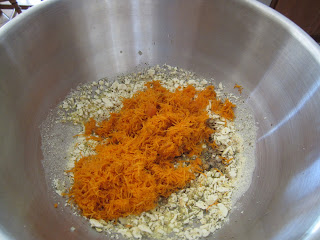
Topped by the ground beef, just shy of 5 lbs.


Mixed by hand until it is evenly smooth and mushed.


I don't like huge meatballs so I made some medium sized (made with a table spoon) and some small size (with melon baller). I actually like the small size better so I made more pans of those.


Pan of medium size balls


Pan of small size balls


Then drain and cool while the next pan goes in. I packaged each pan's worth of meat balls into one freezer bag (thus one meals worth for us).


Next came the browning of meat. Diced onion (about half and onion), shredded carrots (1 cup), minced garlic (1 T), taco seasoning, and ground beef (about 2.5 lbs) - I repeated this 4 times for a total of nearly 10 lbs of beef


I bagged the the browned meat into freezer bags, about 1 lb of cooked mixture each bag, enough for most meals. Then into the freezer. -9 bags of browned hamburger.


-6 bags of meatballs


We actually pulled one bag right back out to make meat sauce over pasta for dinner, and it was a hit!

Next I think I'll try chicken.